The Casing tab on the Well form provides a summary of casing strings run in the well.
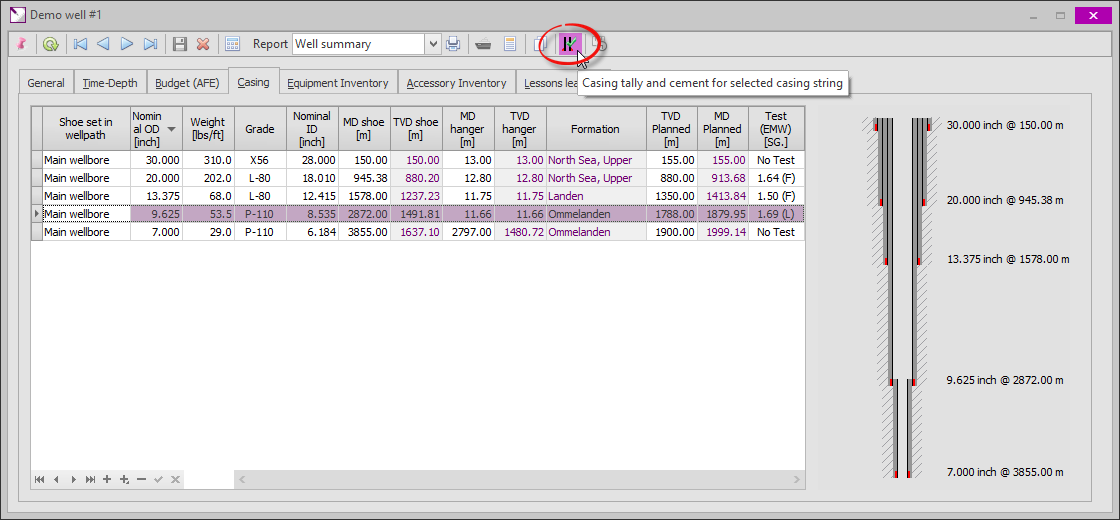
Clicking the ![]() button in the toolbar will bring up the Casing Tally and Cement dialog for the selected casing string. In this dialog, the detailed casing tally and cement jobs may be logged.
button in the toolbar will bring up the Casing Tally and Cement dialog for the selected casing string. In this dialog, the detailed casing tally and cement jobs may be logged.
The first tab contains the casing tally. This screen and the various functions to facilitate easy data input are explained below.
.png)
|
Casing reference data |
|
|
Each casing type run in the string is specified here. For example, if a mixed string containing 9 5/8" 47 lbs/ft and 9 5/8" 53.5 lbs/ft joints is run, two reference casings should be entered in this grid as shown below. Note that when the OD column is selected, an ellipsis button [...] will be shown. Clicking this button will bring up a dialog with a casing catalog from which a casing may be selected. Selecting a casing from this dialog (by selecting a record and clicking [OK) will fill in all fields in this grid from the catalog. |
|
|
|
|
.png)
|
Casing tally |
|
|
Contains the tally for the casing. The following fields are available:
1.Run order. Numeric value used for sorting the tally. Duplicate numbers may exist but when calculating the tally (see 9 below) there is an option to renumber the tally. This is strongly recommended to prevent ambiguity in sorting the tally order. 2.Joint ID. An identification of the casing item. For intermediate joints this may just be a number given to the joint during measuring on deck, but other items may be labeled differently as shown in some examples below. 3.Type. A variety of item types is available from a drop-down list that may be chosen from. Items for which no specific type is available should be labeled as 'Other'. 4.Reference casing. May be chosen from a drop-down list which is populated from the reference casings (1). Note that multiple casing references may be changed in one pass by selecting multiple rows (using Shift-Click or Ctrl-Click) and clicking the [Set reference...] button (5). 5.Connections. Select the applicable connection configuration for the item from the drop-down list (e.g. 'P x B' for Pin by Box joints). Used to calculate the total make-up loss for the item. 6.Centralizer Type. This is a free text input describing the centralizer(s) installed on the item. 7.Centralizer Qty. Number of centralizers installed on the item. 8.Overall Length. This is the overall length of the item, including pin connection(s). Typically this is the measured (uncorrected) value. 9.M/U Loss. The make-up loss for the item. This value is calculated from the reference casing (1) and the Connections field. For example, a B x B item will have a no make-up loss, a P x B or B x P will have 1x the reference make-up loss and a P x P items will 2x the reference make-up loss. 10.Effective Length. The actual length used in the calculation of the tally. Calculated as Overall Length - Make-up Loss. 11.MD Top. Measured depth of the top of the element. 12.MD Bottom. Measured depth of the bottom of the element. 13.Reconciliation. The tally may be input as the running string (e.g. including mudline hanger running tool and landing string). If - for example on a dry exploration well - the running tool and landing string are retrieved, the retrieved items may be labeled as reclaimed. Available values are: In Hole, Reject (planned but not run due to damage), Cut (retrieved partially after cutting) and Reclaimed (retrieved undamaged). |
|
|
|
|
.png)
|
Add casing joints |
|
|
Add multiple casing joints to the tally. This is described in more detail below. |
|
|
|
|
|
Insert casing joints |
|
|
Insert multiple casing joints in the tally above the currently selected item. This is described in more detail below. |
|
|
|
|
|
Set reference casing |
|
|
Set the reference casing value for the currently selected casing items. Select a reference casing and a minimum of two items (elements) in the casing tally. Click [Set reference...] and the selected casing items will be updated to the selected reference casing.
|
|
|
|
|

|
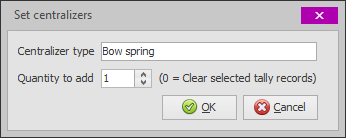
Set centralizers |
|
|
Set the Centralizer Type and Centralizer Qty fields for multiple items in one pass.
Enter a description of the centralizer type, the number of centralizers per joint and click [OK] to update the selected items in the casing tally. As indicated, setting the number of centralizers to zero will clear the Centralizer Type and Centralizer Qty fields of the selected items.
|
|
|
|
|
|
Group assembly items |
|
|
Some assemblies consist of multiple items which may be input individually in the tally. For example, a float shoe assembly consisting of a float shoe and casing (pup) joint. Select the items composing the assembly and click [Group] to indicate the selected items form an assembly, which will be highlighted in light blue.
|
|
|
|
|
|
Ungroup items |
|
|
Select one or more items and click [Ungroup] to indicate they are not part of an assembly. |
|
|
|
|
|
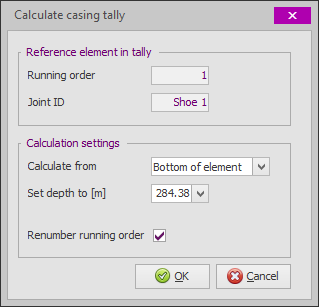
Calculate tally |
|
|
This will calculate and (optionally) renumber the tally (Run Order field). Begin by selecting an item in the tally that should be used for a reference depth. Typically this would be the shoe or a casing hanger. Click [Calculate] and the following dialog will appear.
The Reference element in tally group, displays information on the currently selected item in the tally. In Calculation settings it may be defined if the top or the bottom of the item (element) should be used as a reference and to what (measured) depth it should be set. The reference will be set and all items (elements) below and above it will be calculated accordingly. Check the box is the Run Order fields for the items in the tally should be renumbered and click [OK] to calculate the tally. |
|
|
|
|
Adding or inserting multiple casing joints
Rather than typing all individual items (elements) in the tally, it is possible to add multiple (intermediate) casing joints in a single operation. Click the [Add...] button to append the generated joints to the end of the tally, or select an item in the tally and click the [Insert...] button to insert the generated joints above it. The following dialog box will appear:
.png)
|
Reference casing |
|
|
Select the reference casing to be used for the added (inserted) joints. Only the reference casings in the Casing reference data may be selected. |
|
|
|
|
|
Adding method |
|
|
There are two methods for adding or inserting casing joints: 1.Add a number of joints with zero length 2.Add joints from a list of ID's and lengths |
|
|
|
|
|
Number of joints to add |
|
|
If 'Zero lengths' was selected (2), the number of joints to be added or inserted may be entered here. All add (inserted) joints will have Length = 0.00, which have to be changed manually in the casing tally. |
|
|
|
|
|
Paste from clipboard |
|
|
If a list of joint numbers (ID's) and lengths is available (e.g. in a deck tally in an Excel spreadsheet), it can be imported into the casing tally with only a few mouse clicks. In the Excel sheet arrange the data so that the joint numbers (ID's) and lengths are in two adjacent columns. If required, use copy & paste to copy data temporarily. Next select the two columns (ensure the number of ID's is equal to the number of lengths) and copy it to the clipboard. Now click the [Paste] button and the data will appear in the Import Data grid (7). Set the Value separator so that the grid display two columns correctly (in case of data from an Excel sheet, it will be Tab) and set the correct length unit. Now click [OK] and the tally items will be created with the ID's and lengths in the list. |
|
|
|
|
|
Length unit |
|
|
The length units of the data in the Import Data grid. Note that this should be the length unit of the import data; not the currently selected length unit in WellRep! Choosing the wrong unit will cause incorrect data import (conversion). For example, if WellRep is currently set to Meters, but data is imported from a spreadsheet in Feet, this field should be set to Feet. |
|
|
|
|
|
List of joints to add |
|
|
List of ID's and Lengths used to generate added (inserted) casing joints. Note that in addition to pasting this list from the clipboard (e.g. from an Excel spreadsheet), this data may also be entered manually. |
|
|
|
|
.png)
|
Copyright © 2023 Softdrill NL |